Pages

Monday, November 29, 2010

Daifuku Love and The Journey Back

I practically clapped my hands when I saw it. That innocuous little bag on the bottom shelf at the grocery store, labeled glutinous rice flour. I snatched a bag and contemplated grabbing a second. You don't know how long and hard I search for this stuff. I check every new grocery store I step into. At this point, you're probably shaking your head and thinking, 'Rebecca, chill. It's flour. And weird flour at that.' Bear with me here.
My daifuku making work space. This is messy business, so prepare to get your hands dirty.
I've developed a thing for Japanese desserts fairly recently. And glutinous rice flour, also know as Mochiko, is the primary ingredient in many Japanese desserts, first and foremost, mochi. Mochi is just a glutinous rice cake made by pounding rice into a paste and molding it into a shape. It looks something like this. I have a few blocks of this type of mochi and will be playing with it at a later date. The other type of mochi is soft, and made with mochiko and water on a stove or in a microwave. 


I thought long and hard about what I wanted to make. I've made some fairly disgusting things with mochiko in the past, and I wanted to redeem myself. Finally, I settled on daifuku, little packages of sweet mochi traditionally filled with red bean paste (anko) or strawberries. But because I have a thing for pumpkin, and I found an awesome recipe, my filling was pumpkin. 
Cooking up the filling. It tastes like pumpkin pie. 
Let me tell you, this process is labor intensive. And sticky. Very sticky. To me, it was worth it. I'm glad my boyfriend was there to help me or it would have taken even longer. It is incredibly, incredibly important to keep everything well dusted with potato starch, or corn starch or something. 
Sticky sticky. 
If you've never tried mochi...well, I can't guarantee you'll like it. I love it, but I'll be the first to say the texture is weird. It's soft and a little bit chewy...you'll have to try for yourself. I think it's worth the time if you can get ahold of the ingredients. 
The final product! Aren't they cute?

So. I was all ready to bring these back to school to share with my friends. When suddenly, an hour away from school, we got rear ended on the highway! Yeah! My car is totaled. A police officer brought us away from the accident, but he couldn't fit everything in his car. I tried to retrieve one of the containers of daifuku, but they had gotten all smashed upon impact. My parents are bringing the rest of my stuff from the car to me on Friday. If my daifuku are salvageable, I'll report back on what my friends thought of the result. 

Pumpkin Daifuku from The Anime Blog 


FILLING:

  • 1 15 oz can plain pumpkin
  • 2 tablespoons honey (optional)
  • 1/2 to 2/3 cup white sugar, more or less to taste
  • 1/2 tsp cinnamon
  • 1/4 tsp ground ginger
  • 1/4 tsp nutmeg

MOCHI:

  • 1 1/2 cup mochi flour (mochiko is available at Asian markets as a box with a blue star)
  • 1 1/2 cup water
  • 1/2 cup castor sugar (sold as baker’s sugar)
  • 1 box of katakuriko (potato starch) for dusting hands and utensils
  • 1 tsp vanilla extract (optional)
  • Food coloring (optional)
  • Some beforehand tips:


1. Dust your hands and utensils often with the katakuriko. You DO NOT want the mochi sticking to anything. This stuff is super sticky so avoid getting it on your clothes or in your hair.
2. Create a daifuku-making space before hand by setting out a large cutting board, a large spatula, a round cookie cutter (I just use a drinking glass), a butter knife, and a bowl filled with a decent amount of katakuriko for dusting. Dust the cutting board, the butter knife and the spatula generously with the katakuriko.3. Clear out your kitchen sink. Since you’ll be cooking your mochi in a large pot, you’ll need room to fill that bad boy with hot, soapy water when you’re done to prevent the mochi from hardening up in it.

4. Don’t pour unused mochi down the sink. It’ll harden up and give you much grief. Instead, clear out any remaining mochi with a handful of paper towels and pitch it in the garbage can when it’s cool.
5. Use common sense; wait for the mochi to cool enough to handle before you start to work with it.

For the FILLING:1. Blend all the filling ingredients together well in a medium size sauce pan. Set the heat to medium low and constantly stir the pumpkin mixture for 10 minutes or until the mixture becomes sticky and resembles caramel. Do not overheat the mixture or stop stirring since you might burn it, i.e. make it taste like nasty burnt pumpkin sugar.

2. Line a small cookie sheet with wax paper and drop the pumpkin by rounded teaspoons onto the covered cookie sheet. After the pumpkin has cooled somewhat, roll the drops into balls and pop the cookie sheet into the freezer for about 20 minutes or till the balls are fairly firm.

For the MOCHI:. After the filling has been in the freezer for 20 minutes start making the mochi. If you’re using food coloring, combine it with the water at this point, keeping in mind that less is more. If you’re using vanilla extract toss that in the water with the food coloring and stir it really well. Then blend the mochiko, sugar, and water together in a large pot. I used a wire whisk to make sure there weren’t any lumps in the mixture.

2. Heat the mixture on medium low heat, stirring the entire time. Once again; keep stirring and keep the heat low. After a few minutes the mochi will start to pull away from the sides of the pot. Turn off the heat and pour the mochi (I’ve always had to help the mochi out of the pot with the spatula) onto the well floured cutting board.
3. Spread the hot mochi out with the floured spatula. Try to make it an even thickness.4. Let the mochi cool until you feel it’s comfortable enough to handle. Take the pumpkin balls outta the freezer at this time. Cut a circle from the mochi sheet using the round, floured cookie cutter (upside down drinking glass). If you’re having difficulty prying the circle up from the cutting board, slip the floured butter knife under it and wiggle it free.
5. Flour your hands really well and place the circle in your palm. Take a frozen pumpkin ball and place it in the middle of the mochi circle. Fold the edges of the mochi over the ball until you’ve sealed it in. Pat the mochi gently until it forms a round cake.
6. Dust the cake lightly with katakuriko and place it on a plate. Repeat steps four and five until the filling is gone, remembering to flour your hands and utensils often. If you have leftover mochi, you can just eat it or fill it with whatever you want. Thick jam, nutella, marzipan, I dunno. You can store the daifuku in the fridge for up to a week. 


Friday, November 26, 2010

But then I felt like we didn't have enough dessert...

Cause my cupcakes turned out to be more like muffins. So I thought to myself, 'Self, there isn't enough dessert here.' I glance around halfheartedly and noticing a loaf of Italian bread that was just sitting around taking up space. 
It sorta looked like this.
Hm. I've never made bread pudding. That might be fun. So bread pudding it was. It's pretty much like baked french toast. Great way to use up leftover bread and eggs. Lots and lots of eggs. This bread pudding pudding was of the chocolate persuasion, and it smelled amazing. Seriously. 
Kahlua is nice. But I can't exactly haul a bottle of it around at college.
Here's the thing about bread pudding. It's really hideous. Especially this one. Brown mush, appealing! I honestly avoided bread pudding for the majority of my life because it looks really unappealing. I wish I hadn't. Don't judge a food by its appearance...I seem to be trending towards creating ugly desserts lately haven't I? 
It's good, I swear!
Chocolate Bread Pudding
Recipe from Paula Deen 


  • 1 (1-pound) loaf French or Italian bread, cubed
  • 3 cups milk
  • 1/4 cup heavy cream
  • 1/2 cup coffee flavored liqueur
  • 1 cup sugar
  • 1 cup packed light brown sugar
  • 1/4 cup cocoa powder
  • 1 tablespoon vanilla extract
  • 2 teaspoons almond extract (You probably only need one. Almond extract is powerful. But it's your call)
  • 1 1/2 teaspoon cinnamon
  • 6 eggs, lightly beaten (!!! Six! I know!) 
  • 8 ounces semisweet chocolate, grated (use chocolate chips. Who wants to waste time grating chocolate?) 
  • Whipped cream (optional)
  • Preheat oven to 325 degrees F.
    Lightly grease a 13 by 9-inch baking dish and place the bread in the dish. In a large bowl, whisk together the milk, cream, and liqueur. Using another bowl, combine the sugar, brown sugar, and cocoa powder and mix well. Add the sugar mixture to the milk mixture and mix well. Add the vanilla and almond extract, and cinnamon to the beaten eggs. Combine the egg mixture to the milk mixture and mix well.
    Stir the grated chocolate into the mixture. Pour the mixture over the cubed bread in the pan. Let the mixture stand, stirring occasionally for approximately 20 minutes or until bread absorbs most of the milk mixture. Bake pudding for 1 hour or until set. Check pudding by inserting a knife through the middle and it should come out clean.
    Serve the pudding warm, or refrigerate and serve chilled with whipped cream if desired.


Delicious Pumpkin-ness

I hope all of you had a wonderful Thanksgiving. Or just a really nice Thursday if you're not American. It feels great to be home, and I've been going on a baking spree. First, I helped my sister and her man make an apple pie.
Isn't she lovely? 

Then...I needed some pumpkin. But no one in my family likes pumpkin pie except my mom. 
Sorry Mom. I'll make you a pie someday. 

So instead I made these awesome pumpkin-y muffin thingies. Mm. So delicious and moist. Does anyone else think moist is a gross word? Anyway. These cakes are filled with spices...and sugar...and brown butter...sigh. 
I dunno why the burner looks so awesome.


Brown butter is really flavorful, it adds a lot to baked goods. If you've never worked with brown butter, fear not, it's easy. Just melt some butter, stir, and keep an eye on it to make sure it doesn't burn. It almost has a nutty taste. Annnnd....these were supposed to be cupcakes. With brown butter icing. But they tasted really good without them. In fact, I just ate one. While typing.
Yes, they're ugly. But they make up for it with taste and charming personality. 

Brown Butter Pumpkin Cupcakes

from Martha Stewart's Cupcakes
3/4 cup (1 1/2 sticks) unsalted butter, room temperature
1 2/3 cups all-purpose flour
2 teaspoons baking powder
1 teaspoon salt
1/2 teaspoon ground cinnamon
1/4 teaspoon freshly grated nutmeg
1/8 teaspoon ground cloves
1 cup canned pumpkin puree (not pie filling)
1 cup packed light brown sugar
1/2 cup granulated sugar
2 large eggs
Preheat oven to 325 degrees Fahrenheit. Line muffin tins with paper
liners. In a saucepan, melt the butter over medium-low heat and continue
to cook, swirling occasionally, until butter turns golden brown, Skim
foam from top, and remove from heat. Pour into a bowl to stop the
cooking, leaving any burned sediment behind; let cool.
Whisk together flour, baking powder, salt, cinnamon, nutmeg, and cloves.
In another bowl, whisk together the pumpkin puree, both sugars, eggs,
and brown-butter mixture. Add the flour mixture, and whisk until just
combined.
Divide batter evenly among lined cups, filling each three-quarters full.
Bake, rotating tins halfway through, until a cake tester inserted in
centers comes out clean, about 20 minutes. Transfer tins to wire racks
to cool completely before removing cupcakes. Makes about 15 cupcakes. 


Saturday, November 20, 2010

It's Mah Birthday.

Well, almost anyway. Some people think it's sad to make your own birthday cake. Au contraire! It's fun, and you get to see your work being enjoyed. Birthdays are kind of a big thing in my family. I dunno why, it's just nice to celebrate. Usually my mom will cook whatever food I request, and we either make my cake together or she'll do it for me. I usually pick something rather complex and chocolate-y. Last year we made a Chocolate Darjeeling Tea Cake. This is the first year I'm alone (well, not with my family) for my birthday, and I totally do not have the resources to make a fancy layer cake. So I went for the old standby, a zebra cake! 

Ooh, ahhh. How did you do that Rebecca? It looks hard! Never fear readers, it's incredibly easy. I was exposed to this recipe at a very young age by way of the Magic Spoon Cookbook. So if a ten year old can make it, so can you! It's just whipped cream and chocolate wafer cookies. 
Heck, you can use Cool Whip and stale Oreos for all I care. 

It's delicious. Stick it in the fridge for a while and the cookies turn into cake. Cut it diagonally if you want the pretty zebra stripes. 

Zebra Cake

1 pint heavy cream
1 package chocolate wafer cookies
2 Tbsp powdered sugar
1/2 Tsp vanilla

1. Pour heavy cream into a largish bowl. Add sugar and vanilla, and beat until soft peaks form. 
2. Put a couple teaspoons of whipped cream between two cookies. Repeat process. So you get this kinda thing going on. Make two cookie stacks about twelve cookies each, and lay them next to each other on a 13x9 inch pan. 
3. Put some whipped cream between the stacks to glue them together, and cover the whole thing in whipped cream. Stick it in the fridge for at least four hours, and presto, you've got yourself a cake. 
I love whipped cream.

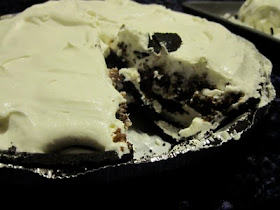
Because I have a lot of friends, I made two cakes. This second one was just me messing around. It's not that beautiful, but it tastes fantastic. I took an Oreo crust, made some more whipped cream, quick baked some double chocolate cookies from a mix I had (I know, I know...) and layered it with whipped cream in the crust. Mmm. Everyone really, really  liked this. You should try it. Experiment with different cookies and crusts and such. I dare you. 
It's the taste that counts...
Delicious Cookie Pie Thing

1 Oreo Crust (or graham cracker, or whatever) 
Approximately 10 cookies (any type you like)
1 pint heavy cream
1/2 tsp vanilla
2 Tbsp powdered sugar

1. Sugar, vanilla, cream, go! Whip until you get yourself some soft peaks. 
2.Spread a layer of whipped cream on the bottom of the crust. Then add a layer of cookies on top of it. Then a layer of whipped cream. Then cookies. You get it. End with a layer of whipped cream on the top. 
3.Stick it in the fridge for at least four hours, remove, devour. 


Sunday, November 14, 2010

And Now For Something Completely Different...

Yeah, two posts in a row. I just couldn't stick these two together. So along with the more conventional and arguably better tasting french toast, I also made...

Pancakes? What's wrong with pancakes you say? Well, nothing really. Pancakes with a can of Mountain Dew isn't exactly a breakfast of champions but you know...oh, wait. I combined the two. Yep. Mountain Dew pancakes. I couldn't help myself. After a friend told me about his disastrous Mountain Dew pancake making experience, I was way too intrigued not to try it myself. I was determined to do (Dew? Ha...) it better. 
They look so innocent! 


I just took a basic pancake recipe and replaced the milk with Mountain Dew. I didn't have any pancake mix or I would have just done it that way, I encourage you to mess around, try different sodas, etc. Oh, how did they taste? Well....they were okay. My friends may disagree with me, but I couldn't taste the soda at all. I'm glad I tried it. I ended up leaving most of them on top of the heater by the door. 

They got eaten...

Mountain Dew Pancakes
  • 1 1/2 cups all-purpose flour
  • 3 1/2 teaspoons baking powder
  • 1 teaspoon salt
  • 1 tablespoon white sugar
  • 1 1/4 cups Mountain Dew 
  • 1 egg
  • 3 tablespoons butter, melted

  • 1. In a large bowl, sift together the flour, baking powder, salt and sugar. Make a well in the center and pour in the milk, egg and melted butter; mix until smooth.
  • 2. Heat a lightly oiled griddle or frying pan over medium high heat. Pour or scoop the batter onto the griddle, using approximately 1/4 cup for each pancake. Brown on both sides and serve hot.


Just Like Mom Makes It...

Gah! Snow! Where did that come from? 
This is not appropriate for mid-November

It is much too cold to leave the dorm for breakfast. I made some french toast. You should too. I had these random slices of bread in my freezer, and they desperately needed to be used before they got all disgusting and moldy. French toast is eeeeeasy.  

All you really need to do is beat some eggs into submission, slap some bread in there and cook it up. But I'd recommend adding some cinnamon and almond extract to the egg mixture if you have it. Or vanilla. But almond is better. Makes it smell so delightful. 

How do you eat french toast? I slather mine in butter and powdered sugar. Yum. 

French Toast
6 pieces of bread (whatever bread you like) 
2 eggs 
2/3 cup milk
couple shakes of cinnamon
1 teaspoon almond (or vanilla) extract. 

1. Beat all the ingredient together in a shallow bowl (or whatever you have) 
2. Heat up a pan on medium-highish heat, grease with LOTS of butter
3. Dip each side of the bread into egg mixture, cook both sides until golden-y brown. 


Thursday, November 11, 2010

Slightly Sparkly, Somewhat Spicy Cookies


So I'm determined to change some people's minds about spicy + chocolate. This is a concept that pretty well developed in the food world, but completely weird to most people I've met. Okay, so maybe a chocolate malt with Sriracha in it wasn't the best introduction. But these cookies are. These were pretty much the first thing I baked with cayenne and chocolate in it, and I must say, I'm totally addicted to the combination. 
I...made a mess. 

In my opinion, the darker cocoa you can get, the better (Hershey's Special Dark is great, but I didn't have any) and you can vary the amount of cayenne pepper for a milder cookie, or one with more heat. I wish I had added more. Also a bit irritated with myself for forgetting to grab some pepper from the cafeteria. Don't leave it out if you can help it, it really adds something. 
So delicious. A bit labor intensive, yes, but everyone will love you. 

Recipe courtesy of Under The High Chair

Mayan Chocolate Sparklers
Topping:
½ cup granulated sugar 
1 tsp ground cinnamon 
Cookies:
¾ cup vegetable shortening 
½ cup unsalted butter, softened 
¾ cup granulated sugar 
¾ cup brown sugar, packed 
2 large eggs 
1 tsp pure vanilla extract 
1 ¾ cups all-purpose flour 
1 ¼ cups cocoa powder 
1 tbsp ground cinnamon 
2 tsp baking soda 
¼ tsp salt 
¼ tsp ground black pepper 
1 pinch ground cayenne pepper 
1 cup semi-sweet chocolate chips 
Preparation:
Preheat oven to 350ºF . Line cookie sheets with parchment paper.
Topping:
Combine sugar and cinnamon for topping.

Cookies:
Beat shortening, butter, sugars
 and vanilla until creamy. Beat in eggs, one at a time. 
Sift together flour, cocoa, cinnamon and baking soda. Stir in black pepper, salt, and cayenne pepper. 
Gradually add dry ingredients to butter mixture, beating after each addition. Stir in chocolate chips.

Roll in 1” balls, don’t flatten. Roll into cinnamon and sugar topping. Place on prepared cookie sheets, about 2” apart.
Bake 7-10 minutes. Cookies should still be soft in center. Let cool on baking sheet for 3-5 minutes. Remove, cool on wire rack.


Introductions

Hi there, I'm Rebecca. Baking and cooking have been major parts of my life for as long as I can remember. Now, as a freshman in college, it's gotten considerably more difficult to exercise my culinary (and gastronomic) skills. I mean, who wants to cook in these conditions? 
There's no counter space whatsoever! 

I had almost resigned myself to a life without baking, when I realized that wasn't going to be possible for me to lose such an integral part of my life. Yes, working conditions weren't ideal, but when there's a will, there's a way! So I gathered up some supplies, started small, and got cooking (no pun intended...well, maybe only slightly...). But if you care to join me, I'll be chronicling the joys and hardships of cooking in a ridiculously small dorm kitchen and making some awesome food way beyond ramen and pre-packaged cookie dough.