Pages

Monday, June 27, 2011

Taste Trip.

I pull out a packet of pink tablets, split them in half, and pass them around. 
"Let it dissolve on your tongue, okay?" I instruct. My sister watches suspiciously. 
"I will not participate in your drug usage," she says with distaste.
Yeah, we were tripping. Flavor tripping. 


The pills were made of something called miracle fruit. When consumed, it causes sour foods to taste sweet. Weird, right?  It's because of something called miraculin, which binds to the sweet taste buds. Not much is known about exactly how it works, but it's pretty cool. 


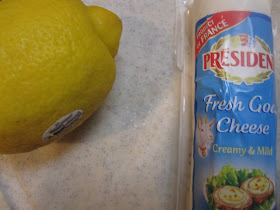
Biting into a slice of lemon tastes like a sweet, delicious glass of lemonade. Ordinary strawberries seem like they're rolled in sugar. A sip of prosecco is fruity and bubbly, without the alcohol-y taste I dislike about alcohol (as you may have noticed, I'm kind of a teetotaler. And underage). I had heard goat cheese tasted like frosting or cheesecake, but when I had a bit, it tasted rancid. It was putrid. No idea why. Everyone tastes things differently I suppose. No one else tried it due to my intense negative reaction, but I'd be curious to know if anyone else experienced this. 

The tablets themselves are kind of weird tasting. As evidenced by my brother's face. 

Flavor tripping is a fun way to play with food. They even have parties dedicated to it. I got my tablets on Think Geek, so if you're interested, get some friends together and try out flavor tripping for yourself!


Sunday, June 26, 2011

I'm here!

Having a house guest can sure throw off a blogging schedule. I've been too busy out in the real world to update here on my little ol' blog! Rest assured, I have still been making things (graduation desserts among them ^_^ ) Want proof?  


Rest assured...they were all delicious. This is kind of mean of me isn't it? I'm going to give you my flourless chocolate cake recipe (the last picture here), which I've been meaning to do for months. Resist pressure to eat this beauty right away, cause it'll just turn out as a molten chocolate cake (also good, but not what you're going for here). In college, this was definitely easier said than done, when there were hungry teenagers hovering everywhere, eager at the prospect of cake. 

Stick around, cause next time, I'll hopefully have something really cool to show you. 

Flourless Chocolate Cake 
from Williams Sonoma 
  • Unsweetened cocoa powder for dusting
  • 10 oz bittersweet chocolate, finely chopped
  • 3/4 cup (1 1/2 sticks) unsalted butter, cut into 6 pieces, plus extra for greasing
  • 5 large egg yolks
  • 1/4 cup plus 2 tablespoons sugar
  • 1 tablespoon dark rum or brewed espresso (optional) (I used 1/2 teaspoon instant espresso powder)
  • 1 teaspoon vanilla extract
  • pinch of salt
  • 3 large egg whites, at room temperature
Preheat the oven to 300. Grease the bottom of an 8 inch round cake pan and line it with parchment paper. Grease the paper and the sides of the pan, then dust with cocoa powder.

In the top of a double boiler, combine the chocolate and the 3/4 cup butter. Set over barely simmering water and melt, then whisk until well blended. Set aside to cool slightly.

In large bowl, with a mixer set on medium high speed, beat together the egg yolks, 1/4 cup sugar, dark rum (if using), vanilla, and salt until pale and very thick. Gradually pour in the chocolate mixture and continue beating until well blended.

In deep, clean bowl, using a mixer on medium high speed, beat the egg whites until foamy. Gradually add the remaining sugar and continue to beat until medium-firm peaks form. Scoop half of the egg whites onto the chocolate mixture and fold them in gently. Fold in the remaining whites just until no streaks remain.
(A Note About Egg Whites: Have you ever heard it said that there's something magical about whipping egg whites in a copper bowl? As silly as it may sound, it's true. Copper ions from the bowl bond with proteins in the whites, creating more stability. Investing in a copper bowl would be a good idea if you're going to be doing this sort of thing a lot, but a glass or stainless steel bowl won't hurt the whites. Do not use a plastic bowl. The surface of plastic is kinda oily, and it'll mess up the stability. Carry on.)


Pour the batter into the prepared pan and spread it out evenly. Bake the torte until it puffs slightly and a toothpick inserted into the center comes out very moist but not liquid, about 35 minutes. Do not overcook. Let cool on a rack for 30 minutes.

Run a small knife around the inside of the pan to loosen the cake, then invert the pan onto a flat plate. Lift off the pan and carefully peel off the parchment paper. Let cool completely. Cover and refrigerate until very cold, at least 4 hours or up to overnight.

Glaze the cake with the chocolate glaze (below), then refrigerate again until firm, at least 2 hours. Transfer to a flat serving plate. Using a thin-bladed knife, cut the cake into small slices, dipping the knife into hot water and wiping it dry before each cut.

Chocolate Glaze
  • 1/2 cup butter
  • 8 oz chopped bittersweet chocolate
  • 2 tablespoons light corn syrup
To make the glaze, combine butter, cut into 4 pieces, and chocolate in the top of a double boiler. Set over barely simmering water and melt, then whisk until blended. Remove from the heat and whisk in the corn syrup until smooth and glossy. Set the cold cake on a wire rack over a large plate or baking sheet. Slowly pour the warm glaze over the center of the cake. The glaze should cover the surface evenly, spilling over the edges and running down the sides, the excess falling onto the plate below.


Sunday, June 19, 2011

A Beautiful Graduation

It's been a crazy past couple of days. My sister's graduation party was yesterday, so I've been up to my elbows in butter preparing a selection of desserts. Want to see what I made? 

Raspberry and Vanilla Cake

Chocolate Truffles

Oreo Cheesecakes

Red Velvet and Cream Cheese Frosting


Macarons with Lemon Curd


It was a lot of work, but it was worth it, seeing how much it was appreciated. Happy graduation Lindsay. Hope it's been everything you wanted and more. You deserve it.


Wednesday, June 15, 2011

Vegan Pumpkin Bread

Brrrr...it's chilly. Feels much more like fall than summer. It's tea and a movie weather. 

Look at the spoon...refraction!
So I guess I can justify making something pumpkin-y because of the tricky weather?  Canned pumpkin, mind you, I wouldn't go out of my way to look for a very out of season pumpkin at this time of year. In my other kitchen ventures, I'm definitely into using in season produce. Berries, avocados, peppers, tomatoes, basil...peaches...you will soon learn of my peach love. Take advantage of all the beautiful colorful fruits and veggies available at this time of year! 

I wanted to show off my new measuring spoons.
Ahem...anyway...back to pumpkin...which doesn't sound nearly as exciting as it did before I started blathering about summer things. But weather totally affects cooking, right? And right now, here, it's cold and rainy. So pumpkin bread it is. Side note, don't take it out 20 minutes before the timer goes off because your brother wants you to take him to McDonalds and you don't want to make him wait and get all irritated. It won't cook all the way. Also, don't let your mother slice it up, throw it into the oven and try and save it by turning it into biscotti. She may leave the house and forget about it, leaving you to find a scorched mess in the (luckily not burned down) kitchen. 


Vegan Pumpkin Bread
adapted from Joy the Baker 

3 1/2 cups all-purpose flour (you can use some wheat, I didn't have any)
2 cups brown sugar, packed
2 teaspoons baking soda
1 teaspoon baking powder
1 teaspoon salt
1 teaspoon nutmeg
1 teaspoon cinnamon
1 teaspoon allspice
1 15-ounce can pumpkin puree, or just under two cups
1 cup vegetable oil
1/3 cup maple syrup
1/3 cup water
1 cup chopped walnuts (or not, if you don't feel like it)

Preheat oven to 350 degrees F.  Place a rack in the center of the oven.  Grease and flour two loaf pans and set aside
In a large bowl, whisk together flours, sugars, baking soda, baking powder, salt and spices.  
In a medium bowl, carefully whisk together pumpkin puree, oil, maple syrup and water.  
Add the wet ingredients to the dry ingredients and use a spatula to fold all of the ingredients together.  Make sure to scrape the bottom of the bowl well, finding any stray flour bits to mix in.  Fold in most of the chopped walnuts, reserving some to sprinkle on top of the batter once in the pan. 
Divide the dough between the two greased pans and sprinkle with a few walnut pieces.  Bake for 1 hour to 1 hour and 15 minutes, or until a skewer inserted in the center comes out clean.  Remove from the oven.  Let rest in the pans for 20 minutes, then invert onto a cooling rack.  


Sunday, June 12, 2011

Seahorses!

Did you know seahorses can't curl their tails backwards? And that they graze constantly and can consume more than 3,000 brine shrimp per day?


My sister told me this bread looked like a seahorse. I guess? But the tail has to curl forward! Obviously she knows nothing about seahorse anatomy. 


I've been feeling very domestic lately. I want to cook a big meal and wear a cute apron. I want to have a dinner party. Can I feed you? Please?


This bread is made with semolina flour, which is the stuff pasta is made of. It's kind of an all purpose bread! Good for savory and sweet things...and it's pretty. Perfect for putting on the table during a nice gathering ^__^


Seahorse Bread


Ingredients:
bread -
  • 2 1/2 cups semolina flour
  • 1 cup all-purpose flour
  • 1 1/2 t salt
  • 2 T olive oil
  • 1/4 oz rapid rise yeast (2 1/4 teaspoons)
  • 1 1/3 cup lukewarm water (around 110 degrees F. I microwaved it for 45 seconds)
  • pinch of sugar
topping -
  • melted butter/egg wash (1 egg white + 1 T cold water whisked together)
  • sesame seeds
Directions:
  1. Combine the semolina, flour, salt and olive oil in the bowl of a stand mixer or in a large bowl. In a small bowl or measuring cup whisk together the yeast, water and sugar. Set aside for a few minutes or until foamy. Pour over the flour mixture. Beat together using the paddle attachment until a loose dough forms. Switch to the dough hook and knead for about 6 minutes or until the dough is stiff and not sticking to the sides of the bowl. (If you don’t have a stand mixer, stir this stuff together with a wooden spoon and pour onto a clean surface and knead until pliable.)
  2. Shape the dough into a ball and place in a greased bowl turning to coat to rise for about 90 minutes, or until double in size.
  3. Gently deflate the dough and divide it in half. Shape each half into an 18 inch long rope. Working with one piece of dough at a time, mark the center of the rope and coil the end to the center. Coil the other end to make an “S” shape. 
  4. Place the loaves on a parchment-lined or lightly greased baking sheet, and cover lightly with greased plastic wrap and set aside to rise for an hour, or until they are nice and puffy. Toward the end of the rise time preheat the oven to 350ºF.
  5. Brush the loaves with the egg wash and sprinkle with sesame seeds. Bake for about 25 minutes or until golden brown. Remove from the oven and cool on a rack.


Wednesday, June 8, 2011

Flourless chocolate cookies + dreams becoming reality

"Don't make any sharp turns," I warned my mother, lowered myself into the back of the car, cake balancing on my legs. I was on my way to deliver my first cake order: a request that from me elicited surprise - then elation. I had always dreamed of being adept enough at creating desserts that people would want my services. And now it's happening. 


It's weird, I just realized this year that cooking is something I really want to incorporate into my career. When I was in elementary school I wanted to be a baker, but as I got older I kind of abandoned that idea and was set on becoming a writer. I now realize I can do both. I'm not exactly sure where it will take me, but I'm not worried. Just enjoying what I have now. 


I wanted to make something homey and easy as a way to unwind. These rather strange looking cookies are safe for people with Celiac disease and gluten intolerance. They'd be just as good with nuts instead of chocolate chips, or peppermint extract and those stripy mints all crushed up.


Oh, and if you're Wisconsin local and interested (or perhaps just wanting to see my offerings) check out my brand new ordering page !


Flourless Chocolate Cookies
Ingredients

3 cups powdered sugar
2/3 cup cocoa powder
a pinch of salt
1 1/2 cups chocolate chips
4 egg whites
1 tsp almond extract

Preheat oven to 350. Line two baking sheets with parchment paper, and spray lightly with cooking spray. Or use silicone baking mats. 
If you have a stand mixer, use the paddle attachment to mix the sugar, cocoa, salt and chips together. Otherwise just whisk it up. 
With the mixer on low, slowly add the egg whites and almond until the mixture is slightly thick. It should be like a brownie batter, not runny. 
Scoop large tablespoons of batter onto the sheets, making sure they're far enough apart (I only had like, 6 cookies on a sheet) 
Bake for 14 minutes, or until tops are glossy and slightly cracked.


Saturday, June 4, 2011

Brioche


I'm developing this baking patience that I never used to have. Maybe it's something that comes with age? It shows up everywhere, but is especially necessary in bread making. There's just so much peace in getting just the right temperature for yeast to thrive, kneading rolling...waiting. 

Whoa, magic yeast!
That waiting for the dough to rise period is a good time to think. Or slide around on the hardwood floor in your socks, either works. 


I had some egg yolks hanging around in my fridge that needed to get used up, so my bread cravings + lonely yolks = Brioche. Brioche is a wonderfully tender french bread (probably due to the fact that it's loaded with eggs and butter. Yay.) The dough was a dream to work with, really soft and smooth. Also, it makes killer french toast


Seriously. Don't even try to resist. 


Brioche
adapted from Almost Bourdain

Ingredients

2/3 cup milk
1½ tsp dried yeast
5 egg yolks, at room temperature, lightly beaten
3 cups flour, plus extra for dusting
2 T sugar, plus extra for dusting
10.5 T butter, diced and softened
For brushing: eggwash
  

(sorry for the annoying tabbing, can't figure out how to make it go away.)
1. Warm milk until it reaches around 100-110 degrees F. Combine yeast, 1 tsp of sugar  and half the milk in a bowl, stirring to dissolve. Stand in a warm place until foamy (8-10 minutes).
2. Whisk remaining milk with egg yolks in a bowl and set aside.
3. Mix flour, remaining sugar and a pinch of salt in the bowl of an electric mixer, fitted with a dough hook, until combined. Make a well in the center, add yeast mixture and yolk mixture. Beat on medium speed until a smooth dough forms (4-5 minutes).
4. While mixing, gradually add one-third of butter at a time, beat until dough is elastic and pulls away from sides of bowl (8-10 minutes). 
5.Transfer to a lightly buttered bowl, cover and stand until doubled in size (1½-2 hours). 
6. Punch dough, knead on a lightly floured surface until smooth, shape into a loaf and place in an 9"x 5" greased loaf pan. Cover, stand until doubled in size (30 minutes-1 hour). Meanwhile, preheat oven to 350.
7. Brush top with eggwash, dust with sugar, bake until golden and risen (25-30 minutes).


Wednesday, June 1, 2011

Monkey Bread 2.0

I'm a grazer. Not literally, though that might be useful in a pinch (curse you appendix for abandoning humans). I mean I like eating small amounts at a time. So eating in a dining hall was kind of hard for me. What if I wasn't hungry at mealtimes? Or only wanted to eat a light meal? Or or or what if there was something good and I only wanted a little but would like more later? Such a difficult life I lead! 
It may look like a homely ball of dough now, but wait until you see what it becomes!
So I definitely did not acquire the freshman 15 this year (could have also had something to do with the complete lack of alcohol consumption). But, complaints about my state of hunger were probably familiar to my friends.

Being hungry at home is a totally different story. If I want to make cinnamon bread at 10 p.m. then by golly I will! And it will be warm and delicious and I will eat it for every meal if I want to. So there.
Still kinda homely isn't it. Welp, you'll still love it, right?


It's kinda like monkey bread but more homemade. Do you know monkey bread? Chunks of ripped up biscuit dough thrown in a bag with cinnamon sugar and baked in a bundt pan? Well, meet the grown up version. Is there an inherent weird shapedness in this type of bread? I guess crevices help spread the cinnamon sugar around...mkay, enough musing. Bake long and prosper? 


Cinnamon Sugar Bread

2 3/4 cups plus 2 tablespoons all-purpose flour
1/4 cup granulated sugar
2 1/4 teaspoons (1 envelope) active dry yeast
1/2 teaspoon salt
2 ounces unsalted butter
1/3 cup milk
1/4 cup water
2 large eggs, at room temperature
1 teaspoon pure vanilla extract

For the Filling:
1 cup granulated sugar
2 teaspoons ground cinnamon
1/2 teaspoon fresh ground nutmeg
2 ounces unsalted butter, melted until browned

In a large mixing bowl (I used just the bowl of my stand mixer) whisk together 2 cups flour, sugar, yeast, and salt.  Set aside.
Whisk together eggs and set aside.
In a small saucepan, melt together milk and butter until butter has just melted.  Remove from the heat and add water and vanilla extract.  Let mixture stand for a minute or two, or until the mixture registers 115 to 125 degrees F.
Pour the milk mixture into the dry ingredients and mix with a spatula.  Add the eggs and stir the mixture until the eggs are incorporated into the batter.  The eggs will feel soupy and it’ll seem like the dough and the eggs are never going to come together.  Keep stirring.  Add the remaining 3/4 cup of flour and stir with the spatula for about 2 minutes.  The mixture will be sticky.  That’s just right.
Place the dough is a large,  greased bowl.  Cover with plastic wrap and a clean kitchen towel.  Place in a warm space and allow to rest until doubled in size, about 1 hour.  *The dough can be risen until doubled in size, then refrigerated overnight for use in the morning.  If you’re using this method, just let the dough rest on the counter for 30 minutes before following the roll-out directions below.
While the dough rises, whisk together the sugar, cinnamon and nutmeg for the filling.  Set aside.  Melt 2 ounces of butter until browned.  Set aside.  Grease and flour a 9x5x3-inch  loaf pan.  Set that aside too.
Deflate the risen dough and knead about 2 tablespoons of flour into the dough.  Cover with a clean kitchen towel and let rest for 5 minutes.  On a lightly floured work surface, use a rolling pin to roll the dough out.  The dough should be 12-inches tall and about 20-inches long.  If you can’t get the dough to 20-inches long… that’s okay.  Just roll it as large as the dough will go.  Use a pastry brush to spread melted butter across all of the dough.  Sprinkle with all of the sugar and cinnamon mixture.  It might seem like a lot of sugar.  Seriously?  Just go for it.
Slice the dough vertically, into six equal-sized strips.  Stack the strips on top of one another and slice the stack into six equal slices once again.  You’ll have six stacks of six squares.  Layer the dough squares in the loaf pan like a flip-book.  Place a kitchen towel over the loaf pan and allow in a warm place for 30 to 45 minutes or until almost doubled in size.
Place a rack in the center of the oven and preheat to 350 degrees F.  Place loaf in the oven and bake for 30 to 35 minutes, until the top is very golden brown.  The top may be lightly browned, but the center may still be raw.  A nice, dark, golden brown will ensure that the center is cooked as well.
Remove from the oven and allow to rest for 20 to 30 minutes.   Run a butter knife around the edges of the pan to loosen the bread and invert onto  a clean board.  Place a cake stand or cake plate on top of the  upside down loaf, and carefully invert so it’s right side up.