Pages

Thursday, January 26, 2012

I love bagels.

I am so sleepy, but it's kind of not okay to crash at 8:30. But my January class is pretty much over, so I'll get to have a little vacation. Wanna know my favorite movies from the class? Of course you do! 

-Rashomon (pretty much the base for any movie with multiple perspectives)
-Mr. House Wife (cute, Korean, better than American rom-coms.)
-Millennium Actress (Very cool anime about the life of an actress. Where do her roles and her real life intersect?)
-Paprika (same director as above, insane electro-pop and vibrant animation, highly recommended. The original Inception.)
-3 Iron (So. Adorable. It's amazing how much can be said with no words at all).

Had to break out the big jar of yeast.
Anyway, BAGELS. I'm really on a roll (harharhar) with the yeast breads right now. It's just so relaxing! And I'd never made bagels before. Pretzels, yes, bagels no. I'm spoiled because I'm originally from New York, and nothing can beat a New York bagel. They're magical, I swear. But I thought I could at least do better than the sub-par bagels at school. 

When you pushed down on the doughs, they made funny "psssshhh" sounds

So...did I? I believe so. Definitely beats Sara Lee. I wish I had some fancy things to put on top, but I'm kind of lacking in the fancy things department over here. So plain had to do. It's amazing how many different breads can be made out of the same kind of dough. These are definitely bagels, but have the same ingredients as sandwich bread. If you shaped your dough into a loaf of bread, boiled it, then baked it, would it turn into a giant bagel? The world may never know...


Bagels


1 teaspoon active dry yeast
1 1/4 cups warm milk (110 to 115 degrees F)
1/4 cup butter or margarine, softened
2 tablespoons sugar
1 teaspoon salt
1 egg, separated
3 3/4 cups all-purpose flour

In a mixing bowl, dissolve yeast in warm milk. Add the butter, sugar, salt and egg yolk; mix well. Stir in enough flour to form a soft dough. Turn onto a floured surface; knead until smooth and elastic, about 6-8 minutes. Place in a greased bowl, turning once to grease top. Cover and let rise in a warm place until doubled, about 1 hour. Punch dough down. Shape into 8 balls. Push thumb through centers to form a 1-in. hole. Place on a floured surface. Cover and let rest for 10 minutes; flatten. In a large saucepan, bring water to a boil. Drop bagels, one at a time, into boiling water. When bagels float to the surface, remove with a slotted spoon and place 2 in. apart on greased baking sheets (Important! I might even use parchment paper). Brush each bagel with the reserved egg white. Don't use an excessive amount unless you feel like having a fried egg white (which I didn't, unfortunately). Bake at 400 degrees F for 20-25 minutes or until golden brown. Remove from pans to wire racks to cool. 

Friday, January 20, 2012

Holla! (Challah)

I've been wanting to say that for a long time, haha. Oh, apparently it's also my 100th post. Yay me? But seriously, challah, where have you been all my life? You are delicious, slightly sweet, and beautiful. You've got it all, don't you? 

I had to use my honey sticks. It's okay, it was for a good cause. 


This challah is of the round and braided variety, which is supposed to be saved for Rosh Hashanah. The circular twisty shape is supposed to represent the cycle of a new year beginning, or something of that nature. It's too awesome to just be eaten once a year! I'm really bad at looking at pictures and figuring out what to do, so I had to watch a video to figure out the braiding. Here, I'll show you. It's quite useful.
Pretty!

Mmm. I want to eat the whole thing. I'm not exaggerating, I am not known to exaggerate about food things. It's sitting next to me as I type. I want it. Stop it, you temptress! On a side note, I'm the proud owner of a Pinterest, which is actually not a good thing for me. I make lists obsessively and this just gives me another excuse to do so. But if you want to look at it and feed my addiction...I won't stop you.

Messy desk! 


Round Braided Challah

(I'll just let you look at the original poster's braiding instructions, or the video, cause it would be useless without the pictures and I don't want to post other people's pictures on here). 
1 1/4 cups warm water
2 tablespoons active dry yeast
1 teaspoon salt
1/3 cup sugar  
1/3 cup canola oil or vegetable oil
2 large eggs
2 tablespoons honey
4-5 cups all-purpose flour
  1. Mix all ingredients together.
  2. Knead until you've got a smooth sticky ball of dough.
  3. Let rise for one hour (or until doubled in size) in a covered bowl in a warm place.
  4. Punch down.
  5. Divide the dough in half
  6. Braid the dough (see braiding instructions below in link. Or just do a normal braid if you feel like it).
  7. Transfer braided dough to a cookie sheet covered in parchment paper or a silpat
  8. Cover and let rise for another hour.
  9. Bake at 350 F for twenty minutes, until golden brown.


Sunday, January 15, 2012

Yatsuhashi

Yesterday felt...lucky. I sipped Mexican hot chocolate in a coffee shop with a friend, went on an amazing, overwhelming asian grocery store adventure with my sister (You don't even know how many things I'm going to be crossing off my ingredients list) and caught up with another friend I hadn't seen in a while over pizza bagels. Mm. It's the buildup of small things that bring me joy. 


Pictured above is one of the exciting things I bought: roasted soybean powder, also known as kinako. It has a nutty flavor and aroma which some say is similar to peanut butter, but I think it has a special, unique flavor. I'm not exactly sure if there's a specific, traditional thing kinako is used for, but I hear it's good for sprinkling on buttered toast, whipping into frosting, and even made into a beverage. Possibilities! 

Nama Yatsuhashi


The recipe I decided on was Yatsuhashi, a Japanese souvenir sweet famous in Kyoto. It's mochi based, made with cinnamon and sugar and think rolled in a kinako cinnamon mixture. It can either be eaten "raw" with filling (nama yatsuhashi) or baked into a puffy cookie (yaki yatsuhashi). I think I preferred the baked kind, they were really crispy and delicious, whereas the raw variety was a biiiit gummy. Try and roll out the dough as thin as you can, even though it's a pain. Try these out, expand your horizons! 

Yaki Yatsuhashi


Yatsuhashi

100 grams mochiko rice flour
60 grams brown sugar
1 tsp. ground cinnamon
85 grams water
3 Tbs. kinako powder
2 Tbs. Ground cinnamon
peanut butter, nutella, anko, whatever, for filling

Procedure:
1. In a microwavable bowl, mix stir mochiko flour, sugar, cinnamon, and water
2. Microwave on High for 1 minute. Mix well. Microwave for an additional 1 minute 30 seconds. Mix well again
3. Wrap the dough in plastic (will be very sticky! I dusted the plastic with kinako before so it would be easier to remove)
4. Knead dough until smooth and comes together
5. In a small bowl, mix cinnamon and kinako
6. Dust a cutting board with the kinako-cinnamon mixture and roll out the dough until thin
7. Cut into squares (mine were about 2 inches x 2 inches
8. Wet two adjacent sides with water, and place 1/2 teaspoon of tsubuan or filling inside.
9. Fold the square into a triangle. Enjoy!

*Variation:
For yaki yatsuhashi instead of cutting in to squares, use a cookie cutter (or knife) to cut the dough into cute shapes (or non-cute shapes). Place on a cookie sheet and bake at 350 for 15 minutes. Turn off the oven and leave in the oven for 15 more minutes.

Wednesday, January 11, 2012

Cookie Dough for Eating

New hobbies I've developed over interim:
Crossword puzzles
Watching Drop Dead Diva (don't judge me!!!)
Thankfully baking is still on this list so I can coerce people to be my friends with cookies and all that jazz. Since I've turned into such a loser. Just kidding! I'm proud of my handicrafts and questionable taste in television. 

Helloooo, communal college fridge. 


The perfect snack to eat while hunched over miniature strips of paper, accidentally cutting yourself repeatedly with scissors to achieve those dang perfect points is cookie dough. Eggless cookie dough, mind you, because the last place you want to be is on your knees worshiping the porcelain gods.  

Forkspoonknife, utensil of champions.

So Rebecca, you ask, how do you make cookie dough without eggs? Simple, young padawan! Greek yogurt, applesauce, banana, or a flax egg, if you please, will all work just fine. You can even use peanut butter if you're feeling daring. Formed into balls, frozen, and half dipped in chocolate, these make great sharing treats. My Asian studies professor found them to be とてもおいしかった。

So versatile! 


Eggless Cookie Dough! 

1 stick (1/2 cup or 4 ounces) unsalted butter at room temperature

1 cup plus 2 Tablespoons all purpose flour

1/2 teaspoon baking soda (i know we’re not baking them, it’s for flavor)

3/4 teaspoons salt

1/2 cup brown sugar

1/3 cup granulated sugar

1 teaspoon vanilla extract

1/3 cup Greek yogurt or applesauce or peanut butter

1 cup semi sweet chocolate chips

1 1/2 cups semi sweet chocolate chips, melted for dipping


In the bowl of a stand mixer fit with a paddle attachment (or with a large bowl and a wooden spoon) cream butter and sugars until light and fluffy, about three minutes in the machine.  Beat in yogurt or applesauce or peanut butter along with the vanilla extract and stir to combine.

Whisk together the flour, baking soda and salt.  Add all at once to the butter and sugar mixture and stir until incorporated.  Fold in chocolate chips.

Scoop big tablespoons of dough onto a waxed paper lined cookie sheet.  Spear each dough ball with a cute plastic fork or a popsicle stick (or not...I wish I had cute plastic forks). Place in the freezer until chilled thoroughly.

When ready to dip the balls, melt chocolate chips in a small saucepan over a low flame or in the microwave.  Remove balls from the freezer and dip into warm chocolate.  Return to the lined cookie sheet and return to the freezer to harden.  Serve cold from the freezer.

Friday, January 6, 2012

Kakaós Csigák (Chocolate Snails)


Someone I care about very much is currently 5000 miles away in Budapest. The city looks beautiful and the opportunity is great, but it doesn't stop me from wishing we could see each other. So how do I bring my own little bit of Hungary to the United States? Through baking, of course.

I can't get over how weird egg yolks are. 


I really don't know a whole lot about Hungarian food. Words that come to mind are paprika and goulash (so much fun to say, try it) but my knowledge in the baked goods department is lacking. Except for dobos torte, sigh. I'm severely lacking in the space and resources for that. I'll save it for another time.

See? This is what I'm working with. I used that bottle of soy sauce as a rolling pin, haha. 


I finally found something called Kakaós Csigák, which I have nooooo idea how to pronounce, but I've seen it translated as chocolate snails, so that's what it will be. In my book, this is the first successful yeast bread I've made at school, without the help of my stand mixer. I don't really count the ugly bread, even though it was tasty. This gives me confidence! Confidence is key! Mmm. To my Hungarian friends out there...miss you. Come back soon!


Kakaós Csigák aka Chocolate Snails
adapted from Chocolate River 

2 1/4 tsp instant yeast
500g flour (about 4 1/2 cups)
50g soft butter (about 3.5 Tbsp)
300 ml lukewarm milk (about 10.25 ounces)
1 egg yolk
4 tsp sugar plus a pinch
4 tsp cocoa powder
8 tsp powdered sugar
to douse:
150 ml milk
50g butter

Pour flour, salt and sugar in a large bowl, make a well in the middle and cut butter around it. Sprinkle into the well, add a pinch of sugar and enough milk to cover the yeast. Stir a few times, then cover it with a dish towel and let the sponge rise for about 15 minutes. Add remaining milk and the egg yolk, then knead the dough for a few minutes until it comes together (if it is a bit sticky, you may want to use a bit less milk first, then add by the tablespoon).  Cover the dough again and let it rise until the volume is doubled – this took about an hour. in the meantime mix icing sugar and cocoa for the filling. Preheat the oven to 350F. When doubled, knead the dough a few times then roll out into a large rectangle. Cover evenly with filling and roll it up, starting with a long edge. I kept dabbing the edge with water to keep it together. Cut into slices and transfer onto a parchment lined baking sheet. Bake for 15 minutes.  Meanwhile, heat the extra 150ml milk and melt the butter in it. pour the mixture over the rolls and bake for another 15 minutes. until puffy and slightly golden.


Tuesday, January 3, 2012

Cream Puffs

January is a strange time for me. Not because of New Year's Resolutions or anything, I don't do those. September is more of a new beginning for me than January anyway. It's mostly because I'm back at school already. High school friends are still relaxing on break at home and here on campus about 1/3 of the students are off campus doing month long study abroad trips or internships. I'm here, taking an Asian film studies class and enjoying the solitude. 

Those are my feet. Cool, huh?

Even the landscape here is silent, as if acknowledging the decreased activity on campus. Already, New Year's Eve seems a million miles away, the warmth of the kitchen just a memory. I made these cream puffs a mere three days ago, but it seems like so much longer. Funny how traveling to a new location changes one's perception of time so much. 


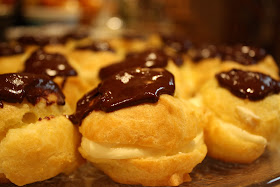
These cream puffs are exceptionally easy to make. The filling, in my opinion, is much nicer than Vanilla Pastry Cream (which still has its place!). It's a combination of vanilla pudding, homemade whipped cream, and almond extract. Genius. I'm expecting this January term will be a time of reflection and quiet, and lots of baking. Hopefully I can find enough people in this ghost town to taste test...


Cream Puffs
from Good Housekeeping

for Pate a Choux (aka, the puffs)


1/2 cup butter
1 cup water
1/4 teaspoon salt
1 cup flour
4 eggs

Spray 1 or 2 large cookie sheets with nonstick spray. Heat oven to 375.
In 2 qt saucepan over medium heat, heat butter, water and salt till butter mixture boils.
Remove from heat.
Add flour all at once. With a wooden spoon, vigorously stir until mixture forms a ball and leaves sides of pan. One at a time, add eggs to the flour mixture, beating well after each addition. Drop dough in heaping tablespoons (I used my cookie scoop) onto trays and bake puffs for 25ish minutes, or until golden. Let them cool completely before slicing each in half with a serrated knife. 

Almond Cream
1 cup heavy whipping cream
1 1/4 cups milk
1 package instant vanilla pudding (one of the smaller, 4 serving size ones)
1/2 tsp almond extract. 

In a small bowl, beat whipping cream until stiff peaks form. In a larger bowl, prepare vanilla pudding according to package instructions, only using 1 1/4 cups of milk. Gently fold whipped cream and almond extract into the pudding until combined. Chill until ready to use. Spoon about a tablespoon into each puff and cover each with chocolate glaze. Refrigerate if not serving right away. 

Chocolate Glaze 
In a small saucepan over medium/low heat, combine 1/2 cup semisweet chocolate, 1 tablespoon butter, 1 1/2 teaspoons of corn syrup and 1 1/2 teaspoons of milk and stir until melted and smooth.