Pages

Thursday, June 28, 2012

Corn Cookies

Logan tore into the cookie with abandon, stopped, chewed thoughtfully, then looked at me with huge eyes. 
"This tastes like corn! Why does this taste like corn?" My mom, sister, and I burst into laughter.
"Is this a joke?" he asked suspiciously. I shook my head, grinning. 
"That's what it's supposed to taste like!"
"Why did you do that?" Logan pouted. "I was expecting candy, not corn!"


Why indeed, Logan. My sister's boyfriend is know for his willingness to try anything, and his horror at my cookies amused me greatly. I first had a corn cookie this past Christmas at, where else, the Momofuku Milk Bar in New York City. I haven't stopped thinking about it since. It was so simple, so unassuming, yet each bite yielded a flavor bursting with the taste of sweet summer corn. 


The reason it has taken me six months to make these amazing cookies lies in the problem of finding freeze dried corn, an ingredient I have never seen and probably never will see in a store (though apparently its carried at Whole Foods). I couldn't justify going online and just buying the corn for myself, just because. I don't like buying myself presents without a good reason. So you can imagine my joy when an unexpected package from my friend Aly arrived on my doorstep containing, among other things, freeze dried corn. I couldn't stop smiling all day. 

....I'm planning on purchasing two pounds of freeze dried corn on eBay. I know, I know. But it's not just for me! It's for my dad, who proclaimed the Corn Cookie his new favorite. I can't say I blame him. 


Corn Cookies 
by Christina Tosi 

225 g butter, at room temperature OR 16 tablespoons (2 sticks)
300 g sugar OR 1 1/2 cups
1 egg
225 g flour OR 1 1/3 cups
45 g corn flour OR 1/4 cup
65 g freeze-dried corn powder OR 2/3 cup
3 g baking powder OR 3/4 teaspoon
1.5 g baking soda OR 1/4 teaspoon
6 g kosher salt OR 1 1/2 teaspoons

1. Combine the butter and sugar in the bowl of a stand mixer fitted with the
paddle attachment and cream together on medium-high for 2 to 3 minutes.
Scrape down the sides of the bowl, add the egg, and beat for 7 to 8 minutes.
2. Reduce the mixer speed to low and add the flour, corn flour, corn powder,
baking powder, baking soda, and salt. Mix just until the dough comes together,
no longer than 1 minute. Scrape down the sides of the bowl.
3. Using a 2 3/4-ounce ice cream scoop (or a 1/3-cup measure), portion out the
dough onto a parchment-lined sheet pan. Pat the tops of the cookie dough
domes flat. Wrap the sheet pan tightly in plastic wrap and refrigerate for at
least 1 hour, or up to 1 week. Do not bake your cookies from room temperature--
they will not bake properly.
4. Heat the oven to 350°F.
5. Arrange the chilled dough a minimum of 4 inches apart on parchment- or
Silpat-lined sheet pans. Bake for 18 minutes. The cookies will puff, crackle,
and spread. After 18 minutes, they should be faintly browned on the edges yet
still bright yellow in the center; give them an extra minute if not.
6. Cool the cookies completely on the sheet pans before transferring to a
plate or to an airtight container for storage. At room temp, the cookies will
keep fresh for 5 days; in the freezer, they will keep for 1 month.

Wednesday, June 20, 2012

My Other Blog - Strawberries + Cream Trifle

Hey everyone, I've posted again at my summer blog! If you'd like to read about this lovely looking trifle (and learn how to make it) head on over to this site!


Sunday, June 17, 2012

La Bête Noire

Happy Father's Day! Or, if you prefer, Happy Falker Satherhood. Do something nice with your dad or that father figure in your life. I think we're doing yardwork and then going to the pool to relax. Perhaps I will prepare a nice meal later!


We're having some interesting dietary challenges in my family at the moment. For health reasons, my dad can have basically no sodium at all. Which makes a lot of baking a challenge. You don't really realize that a bit of salt can really add complexities to the flavor of many baked good, even if you can't actually taste the salt. It's like espresso powder heightening the richness of a chocolate cake. Additionally, my sister is eating a gluten free and largely dairy free diet, also for health reasons. She misses bread and cakes a lot. I would die, I think.


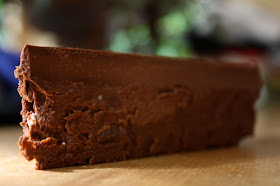
I wanted to make a universally enjoyable dessert that any member of my family could eat without having to worry. A flourless chocolate cake was the obvious answer. Now, I've made that on here before (You probably don't remember because the picture was ugly and the post was kind of dumb). But I've since learned that there are so many opportunities for failure in that recipe, and it often got stuck to the pan. I discovered this recipe last year and there is no going back (sorry Williams Sonoma). It's called La Bête Noire, or, in English, The Black Beast. And it is a beast. 18 ounces of chocolate in the cake itself, topped with 8 ounces in the ganache. Swoon. And there's no egg separating, no mixer, no nothing crazy. So sit back, relax, and enjoy. 


La Bête Noire 
from Bon Appétit

Cake
1 cup water
3/4 cup sugar
9 tablespoons (1 stick plus 1 tablespoon) unsalted butter, diced
18 ounces bittersweet (not unsweetened) or semisweet chocolate, chopped
6 large eggs
Ganache
1 cup heavy whipping cream
8 ounces bittersweet (not unsweetened) or semisweet chocolate, chopped

For cake:
Preheat oven to 350°F. Butter 10-inch-diameter springform pan. Line bottom of pan with parchment round; butter parchment. Wrap 3 layers of heavy-duty foil around outside of pan, bringing foil to top of rim. Combine 1 cup water and sugar in small saucepan. Bring to boil over medium heat, stirring until sugar dissolves. Simmer 5 minutes. Remove from heat.
Melt butter in large saucepan over low heat. Add chocolate and whisk until smooth. Whisk sugar syrup into chocolate; cool slightly. Add eggs to chocolate mixture and whisk until well blended. Pour batter into prepared pan. Place cake pan in large roasting pan. Add enough hot water to roasting pan to come halfway up sides of cake pan.
Bake cake until center no longer moves when pan is gently shaken, about 50 minutes. Remove from water bath; transfer to rack. Cool completely in pan.
For ganache:
Bring whipping cream to simmer in small saucepan over medium heat. Remove from heat. Add chocolate and whisk until smooth. Pour over top of cake still in pan. Gently shake pan to distribute ganache evenly over top of cake. Refrigerate cake in pan until ganache is set, about 2 hours.

Monday, June 11, 2012

Secret Recipe Club – Choco-Coco Banana Rum Bread

Time for another round of Secret Recipe Club! It's oh so much fun. I recently cleaned out our freezer and found what amounted to a whole bunch of bananas, frozen. Now I've done banana on here before. Rather frequently, actually. But I have never had a banana bread recipe. Which is weird! Because it's like, the most basic thing to do with speckly bananas. 

But they are just SO ugly. I will never get over that.

For my whole baking life I feel like I've been striving to achieve banana bread perfection. Nirvana, if you will. I've found recipes that were very tasty (I'm partial to this one) but I've never felt like "oh, this is it. My banana bread search is over". I have a funny feeling I will never reach that point. But I'm okay with that. Nothing wrong with continuing to strive for something elusive, something better.


My blog assignment this month was Robin, Restored and lo and behold, she had a banana bread recipe posted! And...it was from Joy the Baker. I know I promised I wouldn't post anything else from Joy's cookbook, but this was serendipitous. And I adapted it a little, adding some coconut and substituting bourbon (with which I was unfamiliar. Don't judge) with rum. Can't go wrong there. In my opinion, this bread tastes even better the second day. So be patient! 


Choco-Coco Banana Rum Bread

2 cups flour 
 3 tsp baking powder
1/2 cup (1 stick) butter, softened
1 cup sugar
2 eggs
1 tsp vanilla
1-1/2 cups mashed bananas (about 3 bananas)
3 Tbsp rum
1/2 cup shredded coconut
1 cup chocolate chips

Preheat oven to 350F. Grease a 9x5 loaf pan.
Sift flour and baking powder
Beat butter and sugar until light and fluffy.
Add eggs one at a time to butter mixture. Add bananas, vanilla, and rum Mix well.
On low speed, add flour mixture.
Stir in chocolate chips and coconut.
Batter will be very thick. Spoon into prepared loaf pan.
Bake for 45 minutes to 1 hour, or until skewer comes out clean.
Remove from oven and cool about 20 minutes before turning onto wire rack to cool completely.


Saturday, June 9, 2012

Chocolate Marshmallow Malt Cake


Sometimes I like to think that I am quite innovative. My childhood is recorded in notebooks outlining plans of creating an assembly line producing chocolate syrup and jelly snowballs (much more effective for the guerrilla snowball attack I would launch from my underground fort), in egg cartons filled with potion making supplies such as “newt eyes” and “unicorn horns”, in the tissue box and paper towel tube mansions created for my hamster. Heck, I made one of those pinhole eclipse watchers to look at the transit of Venus last week and I was pretty pleased with myself. 

My mess. My feet.

You've already heard about my love for Christina Tosi. But I can't get over her innovation. She has such a unique way of playing with flavor and presenting her desserts. I don't think I've ever seen a cake with exposed layers like hers. And I wanted to replicate one. Problem is....I didn't have a 6 inch cake ring. Or acetate strips. Sigh. Roadblocks.


I do believe that  as you get older you learn to improvise more, roll with the punches. So I worked with what I had. I thought my four inch cake pans would be a cute size, so I cut my layers using that. I built my own ring out of aluminum foil. And instead of acetate strips to build the cake up, I used those clear, report covers. Worked fine. This is definitely a multi-day cake, but it's delicious and fun to make. Well worth the effort. Like I did with the 8 texture tiramisu, I'll outline the order you should probably do things. Also, read all the instructions before attempting so you know what's going on. Give it a go! 


Chocolate Malt Cake
from the Momofuku Milk Bar Cookbook

DO THIS ANYTIME YOU PLEASE:

Malt Crumb Recipe

1/2 cup milk powder
1/4 cup flour
2 Tbsp cornstarch
2 sugar
1/2 tsp kosher salt
4 Tbsp butter
3/4 cup chocolate malt powder
3 oz. white chocolate, melted

Heat oven to 250F. Combine milk powder, flour, cornstarch, sugar and salt. Toss with your hands. Add melted butter and toss until it comes together into crumbs. Spread the clusters on a silpat or parchment lined sheet and bake for 20 minutes. When cooled, toss the crumbs with malt powder until they're covered. Pour white chocolate over crumbs until the clustered are covered. Crumbs will keep in the fridge in an airtight container or in the freezer for a month.

Malt Fudge Sauce 

2 oz chopped bittersweet chocolate
1 cup chocolate malt powder
1 tsp molasses
2 Tbsp corn syrup
1/4 cup sugar
1/2 cup heavy cream

Place first 4 ingredients in medium bowl; set aside. Combine cream, corn syrup, and sugar in heavy medium saucepan. Bring to boil, stirring until sugar dissolves. Pour cream mixture over chocolate mixture in bowl. Let stand 1 minute, then stir until smooth. Whisk until sauce is glossy, about 1 minute. Can be kept in the fridge up to one week. 

Chocolate Cake Recipe

8 Tbsp butter
1 1/2 cups sugar
3 eggs
1/2 cup buttermilk
1/4 canola oil
1 tsp vanilla extract
3 Tbsp Fudge Sauce (listed below) 
1 1/4 cups cake flour
1/2 cup cocoa powder
1 1/2 tsp baking powder

Fudge Sauce 

1 oz bittersweet chocolate, chopped
2 Tbsp cocoa powder
2 Tbsp corn syrup
2 Tbsp sugar
1/4 cup heavy cream

Place first 4 ingredients in medium bowl; set aside. Combine cream, corn syrup, and sugar in heavy medium saucepan. Bring to boil, stirring until sugar dissolves. Pour cream mixture over chocolate mixture in bowl. Let stand 1 minute, then stir until smooth. Whisk until sauce is glossy, about 1 minute.Can be kept in the fridge up to one week. 

Heat oven to 350F. Combine butter and sugar in a stand mixer with the paddle attachment and cream for 2-3 minutes. Scrape down the bowl, add eggs and vanilla, and mix on medium high for 2-3 minutes. On low speed, add buttermilk and oil. Increase the mixer to medium high for 3-5 minutes until the mixture is very pale and fluffy. Add the fudge sauce and mix until fully incorporated. Stir in flour, cocoa, and baking powder and mix until it comes together. 

Spray a quarter sheet pan and line it with parchment. Spread the cake batter in the pan and bake for 30-35 minutes. Cool on a wire rack. Cake can be stored tightly wrapped in plastic for up to 5 days. 

DAY OF ASSEMBLY:

Charred Marshmallows

Spread 2 3/4 cups mini marshmallows on an unlined sheet pan and char them with a blowtorch or under the broiler. Don't be afraid. Transfer to the fridge or freezer for 10 minutes then use immediately. 
Malt Soak
 
Whisk together 1/4 cup milk with 2 Tbsp chocolate malt powder until completely dissolved. Use immediately


LAYER ONE:
Clean the cake ring and place it on a silpat lined sheet pan. Use a strip of acetate to line the inside of the cake ring. Stamp out three 4 inch rounds from your sheet cake (or two 6 inch rounds, gather up the scraps) and place one round in the ring, or tamp down your scraps into the bottom layer. Spread half the chocolate malt soak into the cake. Spread 1/5 of the warm malt sauce on the layer, then half of the malt crumbs and 1/3 of the charred marshmallows. Spread another 1/5 of the malt sauce over the marshmallows. 

LAYER TWO:
Gently tuck another strip of acetate between the cake ring and the top strip of acetate so there's a cake ring 5-6 inches tall. Set a cake round on top of the first layer and repeat the process for layer 1. 
LAYER THREE:
Nestle the remaining cake layer on the top of the malt sauce. Cover the top of the cake with the remaining sauce and marshmallows. Freeze the cake for 12 hours or up to 2 weeks. At least three hours  before serving the cake, pull out the sheet pan and gently pop the cake out of the ring and remove the acetate. Transfer to a plate and let it defrost in the fridge before eating. 
Nice job, you've finished! Now devour your work.

Monday, June 4, 2012

My Other Blog : Rhubarb Sweet Rolls

Hi everyone! As you may or may not know, I'm working as an editorial intern at a local magazine this summer. Part of my duties involve keeping my own blog/column. My theme, of course, revolves around food, and I've chosen to visit local farmer's markets and talk about fresh produce. I think of it as the slightly more refined older sister of this blog. Perhaps it will rub off here! 

Anyway, I tried rhubarb FOR THE FIRST TIME (I know, and I call myself a lover of food...) and wrote about it. Clicky clicky here for the post


Friday, June 1, 2012

Buttermilk Biscuits + Peach Butter

The dishwasher is broken. The piles of drying silverware on the counter are unsettling, and the dishes soaking in the sink make me shiver. I like neat counters, clean cooking spaces (my mother might disagree, seeing as she sometimes refers to me as "The White Tornado", due to my tendency to pile things on every open space). But I must bake. It is an insatiable urge that leaves me fidgety when unfulfilled. 


As I was cleaning out the freezer to make room for another Momofuku monstrosity (fear not, it will be posted soon), I discovered about four pounds of last season's peaches were no way going to fit back in the freezer. And as you may know, peaches do NOT go to waste under my watch. But what to make...


I'm not exactly sure how I settled on peach butter. Perhaps because it's quite portable, and I needed to show my new co-workers that I do indeed cook, I'm not just bluffing. In the process, I learned how to can things. And I didn't even give anyone botulism in the process! It's comforting I can now prepare food that will keep indefinitely. Y'know, to survive the oncoming zombie apocalypse. 

You need someone on which to spread all that delicious, peachy goodness. Buttermilk biscuits are a fine choice, and they come together pretty much instantly. 


Peach Butter 

adapted slightly from smitten kitchen 

4 lbs peaches
1 cup water (Note - since my peaches were frozen, they didn't need water....use your judgment)
1 1/2 cups granulated sugar
1/2 cup vanilla sugar (If you don't have this, no worries, just use more normal sugar)
a splash of amaretto

Before doing anything, decide if you're canning or not! Or you aren't, the peach butter will stay in the fridge for two weeks. If you are, it'll be good forever. 
Canning prep: First, sterilize your jars, either by boiling them in a large, deep pot of water (which should cover the jars completely) for 10 minutes or washing them in lots of hot soapy water, rinsing and drying the parts well and then place the jars only in a 200 degree oven for 20 minutes. Set them aside. 

If your peaches aren't already peeled, cut a small x in the bottom of each (unless they're already sliced) and dip them in boiling water for 30 seconds. Immediately transfer to cold water; the skins should slip right off. Place peach chunks and water in a large pot and bring to a boil. Simmer until peaches are tender, about 15 to 20 minutes, stirring occasionally to ensure they cook evenly. If you like your peach butter smooth (I do), puree them in a blender or food processor, then return to the pot. Add the sugar and amaretto and bring the mixture to a good strong simmer/gentle boil, cooking them at this level for 30 to 40 minutes, stirring occasionally in the beginning and more often near the end, as it thickens up and the fruit masses risk scorching on the bottom of the pot. 

There are several methods to test for doneness: You can drizzle a ribbon of sauce across the surface; when that ribbon holds its shape before dissolve into the pot, it is done. Some people use cold or frozen plates; dollop a spoonful in the middle of one and if no water forms a ring around it in a couple minutes, it is done. Others use a spoon; if the butter remains rounded on a spoon for two minutes, it is done. You can also check the pot itself; the butter is usually done when a wooden spoon leaves a clear train when scraped across the bottom.

If you aren't canning the peach butter, let it cool before storing it in the fridge. If you are...

Divide your piping hot peach butter between your jars, leaving a little room at the top. Wipe the rims clean with a dry towel and cover the jars with their lids. Submerge the jars in a large, deep pot of boiling water for 10 minutes, either in a removable basket or using tongs to dip and remove them. Let cool completely on towels, a process that can take overnight. If canned properly, the peach butter should last indefinitely at room temperature.


Buttermilk Biscuits

2 cups unbleached all-purpose flour, plus more for dusting the board
1/4 teaspoon baking soda
1 tablespoon baking powder (use one without aluminum)
1 teaspoon kosher salt or 1 teaspoon salt
6 tablespoons unsalted butter, very cold
1 cup buttermilk (approx)

Preheat your oven to 450°F.
Combine the dry ingredients in a bowl, or in the bowl of a food processor.
Cut the butter into chunks and cut into the flour until it resembles course meal.
If using a food processor, just pulse a few times until this consistency is achieved.
Add the buttermilk and mix just until combined.
If it appears on the dry side, add a bit more buttermilk. It should be very wet.
Turn the dough out onto a floured board.
Gently pat (do not roll with a rolling pin) the dough out until it's about 1/2" thick. Fold the dough about 5 times, gently press the dough down to a 1 inch thick.
Use a round cutter to cut into rounds. Place the biscuits on a cookie sheet touching each other. Bake for about 10-12 minutes- the biscuits will be a beautiful light golden brown on top and bottom.